Through this blog i will try to pen what i learnt on how to create Virtual Network in Azure.
Pre-requisites :
Azure account, if you do not have one, follow the link to create one, Microsoft is offering 12 months of free services.
https://azure.microsoft.com/en-us/free/
I assume the reader has basic understanding of Networking concepts (virtual net, subnet, network security group and virtual machine)
By the end of this post, you will be able to create virtual network, create subnet, create network security groups for each subnet and create a virtual machine in subnet.
Lets get started by logging to Azure portal , following is the dashboard with my credentials.

Click on Create a resource and search for virtual network.


Create Virtual Network
Creation of virtual network has 5 steps as per the following screen shot.
Step 1: Basics
The first steps has the basic details where we will have to select subscription. As per screen shot below Azure subscription 1 is my pay-as-you-go subscription. If you are using Azure free subscription you can select it from the dropdown.
Resource group : A resource group is a container that holds related resources for an Azure solution.
I am creating a new resource group called tweakrg, so that i can group all my related resources into this group. If you already have a resource group it can be selected from the combo box.
Following resource group are Instance details, where we can name the virtual network and select the region. I am naming my VNet instance as tweakvnet.

Step 2: IP Addresses
Microsoft definition : When creating a VNet, you must specify a custom private IP address space using public and private (RFC 1918) addresses. Azure assigns resources in a virtual network a private IP address from the address space that you assign. For example, if you deploy a VM in a VNet with address space, 10.0.0.0/16, the VM will be assigned a private IP like 10.0.0.4.
The default value for IPv4 address space is 10.0.0.0/16 (which assigns 65,536 addresses), i won’t be using all the spaces. So for demonstration purpose i am just using 64 addresses ,so i updated the default value to 10.0.0.0/26. I have 64 spaces in my VNet. Now, we have spaces, the next step is to create subnet.
I created a subnet by giving it a name tweakfrontend, assuming i will have frontend facing vm’s into this subne (refer to following screen shot) and i have given 16 spaces (10.0.0.0/28).
Note: you will not get all 16 spaces, 5 address spaces will be reserved for Azure.
Service Endpoints :
Microsoft definition : Virtual Network (VNet) service endpoint provides secure and direct connectivity to Azure services over an optimized route over the Azure backbone network. Endpoints allow you to secure your critical Azure service resources to only your virtual networks. Service Endpoints enables private IP addresses in the VNet to reach the endpoint of an Azure service without needing a public IP address on the VNet.
We are not covering service endpoints in this blog. So i did not select service endpoint and retained the default option as 0 selected.

i created 2 more subnets with 8 spaces each (3 + 5 reserved for Azure) and named them (tweakbackend, tweaksharepoint). The idea behind creating multiple subnet is to demonstrate how the inbound rules can be applied to each subnet. I am going to enable http ports for tweakfrontend subnet and restrict http for other subnet.


Step 3: Security
There are 3 options to choose from in Security BastionHost, DDOS and Firewall. The default option is DDoS protection. I will retain the defaults. I will explain all three option in detail in my next blogs.
BastionHost : The Azure Bastion service is a new fully managed PaaS inside Vnet. It provides secure and seamless RDP/SSH connectivity to yor virtual machines directly in a Azure portal over SSL. It is specifically designed to be at the perimeter of your network instead of opening public ip.
DDos : Distributed denial of service
Firewall : Unlike traditional firewall, we have to create Firewall subnet address space and public IP address to configure.

Step 4: Tags
If you are not categorizing resources, leave it as default and move on to next and final step.

Step 5 : Review + Create
After successful validation, create the Virtual Network.


tweakvnet virtual network was created with 64 address spaces.

Now we have VNet available, its time to create NSG and add it to vnet , subnet.
Create Network Security Group
NSG for tweakfrontend subnet
Click on add resources and search for network security group and proceed to create one.

Step 1: Basics
In the step1 we need to select resource group, since we already created tweakrg resource group for all vnet related resources. I am going to select tweakrg as my resource group.
I am going to assign this nsg to tweakforntend subnet, so I will name my instance as tweakforntendnsg

I am leaving the tags section as default and moving to Review and Create my NSG.


nsg for tweakbackend subnet
I am creating another nsg for my tweakbackend subnet. So the naming convention as follows.


Once the 2 nsg’s are created, click on resource groups. This action will navigate to all the resource which uses this resource group. I am interested in checking what my Inbound and Outbound rules are for my nsg are. Click on tweakforntendnsg

Clicking on tweakfrontendnsg will list all the Inbound and Outbound rules as per the following screen shot. The rules go from 65000 to 65500 in asc order. Lets understand what these rules mean to your VM in tweakfrontend subnet. The rule 65000 says, AllowVnetInbound meaning all the traffic from the tweakvnet virtual network is allowed. The second rule 65001 allows traffic from load balancer if there is any.
Let us add a new rule to tweakforntendnsg, which will allow traffic from http port 80.

Click on Inbound security rules on left menu and select new button as highlighted in the following screen shot.

The Add action will open up Add inbound security rule window where you can configure and add rules, i am selecting basic as highlighted in the screen shot.

The Basic option has list of all the services already configured. I want to allow http traffic over port 80, so i will selected http from the service combo.

port 80 is the default port so it is disabled, i name my rule as port_80 and hit on save.

The save action will add port_80 inbound rule into my nsg

Now, i will navigate back to my subnets defined in tweakvnet Virtual network. I am selecting tweakforntend subnet to assign the tweakforntendnsg nsg to this subnet.

Navigate to subnet and select network security group as tweakforntendnsg and save. All the VM’s in this subnet have the inbound, outbound rules as they are defined in the nsg.

Create Virtual machine
Click on Add new resource and navigate to compute and select Virtual machine.

Step 1: Basics
Similar to VNet the first step was to allocate resource group. Since we have already created tweakrg while creating VNet, i am using the same resource group, so that all the related resources will be under tweakrg.
Input custom instance name for VM and select region.

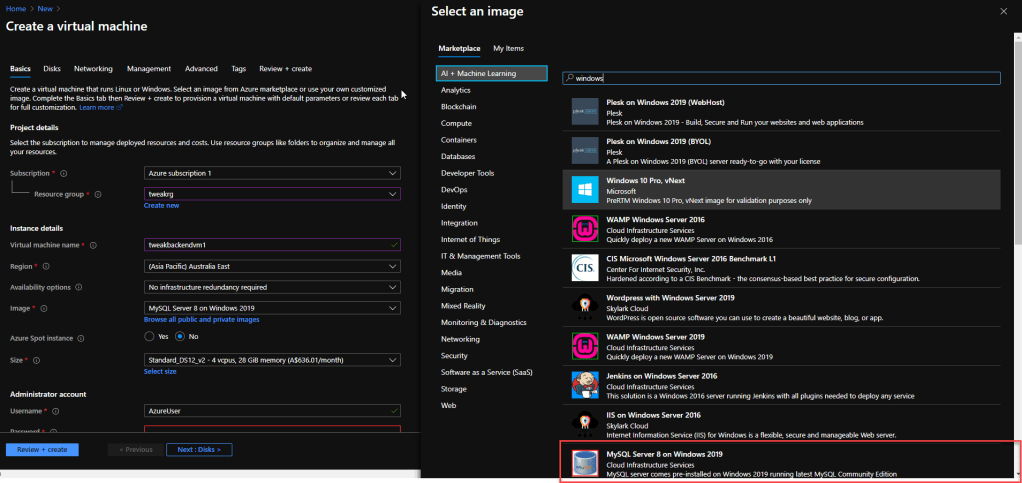
Next, click on browse all public and private images and select desired instance, in this example i will assign this instance to tweakbackend subnet, so i selected MySQL Server 8 on Windows 2019.
After selecting the instance, input user credentials.

After entering the credentials, we can define Inbound port rules for the traffic to flow through. Since this is a VM for tweakbackend subnet, i am restricting access to http ports 80 and 443. If the VM was created for tweakforntend subnet, then i will enable HTTPtraffic by enabling HTTP (80) and HTTP (443) ports. I retained the defaults as none for inbound port rules.

Step 2: Disks
Select the OS Disk type, i have selected standard SSD and left other options as default.

Step 3: Networking
In step 3, we will be linking this VM to virtual network, subnet we have created at the beginning of this blog. I am linking VNet to tweakvnet, subnet to tweakbackend. I am leaving Public IP and NSG to default. Remember, We have created Inbound rules in step 1, if we want to define rules at the subnet level, then we can create Network Security Group and link it to the tweakbackend subnet. It is recommended to define NSG and assign it to subnet level. For demonstration purpose i am leaving it default.

Leave the advanced and tags steps as default and proceed to review+create

The validation has passed and the Virtual Machine can be created.
Once the VM is created, the following resources will be created (network interfaces, diagnostics)

On navigating to tweakbackendvm1, we can see the associated VNet and Subnet to which this VM is assigned to.

On navigating to tweakvnet, we can see the subnet and associated NSG of this VNet.

To check what all resources are created, navigate to resource group and select tweakrg. Following is the list of resources created.

Hope you enjoyed creating vnet, subnet and vm using Azure.
Happy Learning!!

One thought on “Azure Virtual Network step by step guide”